How Hollywood is Losing Ground to Silicon Valley's Big Tech Giants

Aug 29, 2023

There was a time when Hollywood was the undisputed champion of entertainment, with its blockbuster releases and red-carpet glamor. But times are changing, and it appears that the big tech companies of Silicon Valley are gradually stealing the show—or should we say, the movies?

The technological titans of Silicon Valley have entered the entertainment game, and they are not playing around. With the advent of streaming services like Amazon Prime, Apple TV+, and Google Play Movies, the big tech companies are offering a plethora of movies and TV shows to audiences at the click of a button. They can make data-driven decisions, target niche audiences, and operate on a global scale. The versatility and the ability to adapt quickly give them an advantage over traditional Hollywood studios.

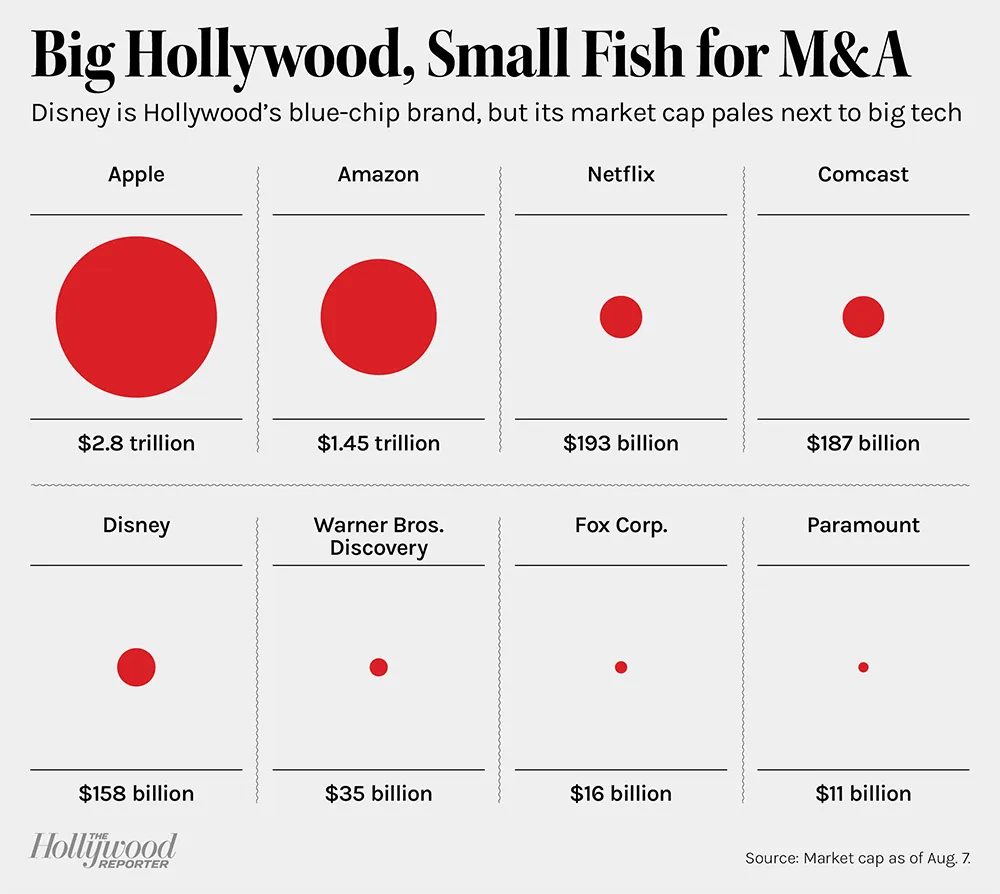
Let's talk numbers. Even the smallest of the big tech companies dwarfs the biggest Hollywood conglomerate. For instance, as of 2021, Apple Inc.'s market cap exceeded $2 trillion, while the largest Hollywood media conglomerates, like Disney, were valued at a few hundred billion dollars. This difference in scale allows tech companies to invest more, take greater risks, and capture market share more effectively.

If there is one domain where big tech hasn't yet completely taken over, it is the cinemas. Cinemas remain a unique space where audiences can experience films without the direct influence or intervention of tech companies. However, even this is changing as many people are choosing the convenience of streaming over the cinematic experience.

While streaming services have allowed Hollywood studios to reach a larger and more diverse audience, they are also walking into a trap. By focusing on streaming as a primary method of content distribution, studios are ceding more and more ground to tech companies who already control the digital infrastructure and the algorithms that recommend what to watch.

Here's another catch: Hollywood studios need to make money from their streaming offers to stay afloat, while big tech companies don’t necessarily have to. With diverse income streams, from cloud computing to advertising, big tech can afford to play the long game in the entertainment industry.

Hollywood should focus on capturing more value in areas where big tech companies either don't want to be or find it difficult to scale. This could be things like live events, theater shows, or even experience-based theme parks. Hollywood needs to go beyond the screen and offer something that tech companies can’t replicate easily.

To reclaim its position, Hollywood needs to go back to its roots—making more original, high-quality movies that compel audiences to visit theaters. The nostalgia, the popcorn, the community feeling of a packed theater laughing and crying together—these are experiences that technology can’t fully replicate. Hollywood should also consider capturing more value from in-theater consumables like popcorn and soda, or advertisements, to maintain profitability.

The tech giants of Silicon Valley have shifted the dynamics of the entertainment industry. However, all is not lost for Hollywood. By focusing on its strengths—original content, cinematic experiences, and areas difficult for tech companies to enter—Hollywood can still put up a good fight. After all, in the movies, it's always darkest before the dawn.


Is Apple's Anticipated AR/VR Headset a Misplaced Bet in the Current AI-Driven Market?

Jun 05, 2023

As the day of Apple's annual Worldwide Developers Conference (WWDC) keynote draws near, rumours about the tech giant announcing its new Augmented Reality/Virtual Reality (AR/VR) headset are swirling around. Five years ago, AR/VR was heralded as the next big thing in technology. However, it proved to be an overhyped concept with little real-world application beyond specific domains such as gaming and industrial design.

Despite the waning interest, it seems Apple has heavily invested in the development of an AR/VR headset. Considering the high development costs and the expected retail price rumoured to be way out of reach for the average consumer, it is debatable if this product could ever generate the return on investment Apple might be hoping for.

In the meantime, there's an industry shift happening that Apple seems to be missing: the surge in generative AI technology. Powered by models like ChatGPT, generative AI has shown immense potential and versatility, influencing numerous sectors from customer service to content creation. In my experience as a programmer, this shift is already having significant impacts. It’s leading the way in automating tasks, simplifying processes, and ushering in a new era of human-computer interaction.

Yet, Apple seems to be falling behind in embracing this revolution. The company currently lacks a substantial offering for developers and businesses that are keen to exploit the potentials of AI. Moreover, Apple's absence of a strategic partnership with industry leaders like Nvidia, renowned for its AI tech, further widens this gap.

Even within its product line, Apple's GPU capabilities seem to fall short when compared to competitors' offerings. Despite their impressive performance in specific niches, Apple's GPUs are yet to pose a serious threat to established players in the high-performance computing arena, particularly in AI applications.

Furthermore, when it comes to AI integration, Apple is lagging. Siri, despite being one of the earliest digital voice assistants, is now being surpassed by larger, more capable language models. The lack of any noteworthy announcement regarding the integration of such models is a testament to Apple's apparent disregard of the rapidly advancing AI sector.

So, as the tech world holds its breath for Apple's WWDC, one can't help but wonder if the company's continued focus on flashy hardware over evolving software paradigms could lead to its downfall. If Apple does not make significant strides in the world of AI, or at least signal intent, we might see the company missing a significant opportunity.

Given these concerns, if Apple's keynote revolves solely around the introduction of an overpriced AR/VR headset, the question then arises: is Apple's current stock valuation justifiable? Could Apple, once the beacon of innovation, be on the verge of a period of decline?

Only time will tell. As an observer of the tech industry and a programmer, I’ll be watching carefully, hoping for an exciting surprise but bracing for disappointment. The era of AI is upon us, and it's high time that Apple acknowledges it and stakes its claim.


Bose QuietComfort Earbuds II vs. Apple AirPods Pro: A Personal Experience

Jun 03, 2023

My journey with the Apple AirPods Pro has been a love-hate relationship, to say the least. The fantastic initial performance is sadly overshadowed by the recurrent issues I've faced after using them for a significant period. I've gone through three pairs of these earbuds, each presenting me with unique, frustrating problems:

  1. Unpleasant cracking noises in the left ear when the noise-canceling feature was active.
  2. Distorted audio alterations whenever I moved my head, eventually normalizing after a few seconds. It made me suspect the 3D audio functionality, which seemed to be persistently active and confusing to deactivate.
  3. An incredibly annoying buzzing sound when using them in bed. The earbuds, when pressed into the ear by the pillow, turned bedtime tunes into a rather uncomfortable experience.

Given that this was my third encounter with problematic AirPods Pro, and considering their premium price tag, I thought it was high time to switch. I decided to give the Bose QuietComfort Earbuds II a shot, considering my previous positive experiences with Bose headphones.

My experience with the Bose earbuds was a mixed bag. They were undeniably comfortable, but they offered a distinct user experience compared to the AirPods Pro. I tested them in a variety of situations - during bus rides, cycling, and walking my dog. Here are the strengths and weaknesses I discovered:

Pros: - The fit was excellent, promising comfortable wear even during extended use. - The audio quality was a cut above the AirPods Pro, providing a richer overall sound. - The noise-canceling capability was superior, particularly evident while biking amidst wind noise.

Cons: - The Awareness or Transparency mode didn't quite measure up to the AirPods Pro. While walking my dog, I prefer to hear the ambient sounds, like passing cars, wind rustling through leaves, and chirping birds. Unfortunately, these details got lost with the Bose earbuds. - In quieter environments or while in bed with the earbuds on but not playing anything, there was an annoying bass noise. The AirPods Pro didn't have this issue, providing a more comfortable silent experience.

In conclusion, the Bose QuietComfort Earbuds II and Apple AirPods Pro serve different purposes. The Bose earbuds shine in situations where noise-canceling is crucial, while the AirPods Pro provide a more wholesome audio experience when they work properly. But for me, the AirPods' frequent breakdowns tipped the scales, making the search for the perfect earbuds an ongoing quest.


How I Ran My Own Mastodon Server in 10 Minutes

Jan 19, 2023

There’s much talk at the moment about alternatives to Twitter, mostly because people hate the abusement and hate that Twitter is now not actively suppressing anymore under its new ownership. Some just think, that Elon is a bad and narcistic person and don’t want to do anything with the platform anymore. For me, it’s mostly because a lot of people I follow just moved away from Twitter and there is not a lot to read on the feed anymore and yes also because of the new leadership direction. It seems that everybody moved on to Mastodon, which is basically the same concept, but implemented in a distributed manner. There is no one single company controlling the service, but rather a huge number of individual Mastondon instances running, of which all are controlled and administered by unrelated people or companies. The concept is very intriguing, but comes with some downside. If you want to connect on Mastodon, you first have to find a service instance that is willing to give you an account and finding those is not easy. If you google for it, you might find a list of servers, that is fairly up-to-date. You then click through every link and see if the server does have a sign up page. But before that you also might want to check the local timeline to see if the right kind of people are on that instance.

But there’s an alternative, one that also has the advantage of owning your own data. Run an instance for yourself or for you and your closest friends. I advice against of running a Mastodon server for just anybody, because that would come with a lot of time commitment to police the content. You don’t want to do that. Here is what I did for me and my friends of Made@Gloria.

It was easier than I thought. The TLDR is:

  1. Register a glorious domain with Hover

  2. Go to Digitalocean Marketplace and start a Mastodon droplet

  3. Follow the droplets installation readme

  4. Point the domain’s DNS to the droplet’s IP address

1. Register a glorious domain with Hover

If you run a web service on the internet, you may want people to find it. Which means, you need your own domain. I have an account at Hover, but you can use any other domain registrar. Choose one that also runs a DNS service. That makes it easier for you to point the domain to something.

2. Go to Digitalocean Marketplace and start a Mastodon droplet

Well, you can install a mastodon server on any virtual machine you can get, but that means following the lengthy install instructions and having a bit knowledge of the linux command line. The easier thing is to let other people do it for you. You can find preinstalled server images on a lot of hosting platforms. On Amazon AWS, you would browse for a Mastodon AMI. I happened to run this blog on Digitalocean and that’s where I checked. Digitalocean’s registry of system images is called Marketplace. There you can search for Mastodon and click on Create Droplet. Change the instance type to the cheapest one that is offered and make sure you have an SSH public key uploaded that you then choose for that instance or just let Digitalocean create a new one.

3. Follow the droplets installation readme

You will need to run a couple of commands in the command line to set up your service. Digitalocean makes that pretty easy. In your list of Droplets you get a link that opens up a drawer to detailed instructions on how to setup your Mastdon instance. For image upload you can use Digitalocean Spaces, which basically is an S3 clone. For email, I am using Sendgrid. You will also need to setup your own account as the instance’s admin.

RAILS_ENV=production bin/tootctl accounts modify alice --role Owner

That was somehow missing from the Getting Started instructions.

4. Point the domain’s DNS to the droplet’s IP address

Back on Hover click on DNS setup and create an A record to your Digitalocean droplet.

Sign in to your Mastdon instance and head to Preferences/Administration/Server Settings/Registrations. There you disable all registrations by not allowing anybody to sign up. Instead you are going to send out invites to individual people. And that’s it. It did not take me longer that 10 minutes to set this up. Well, I already had set up user accounts on Hover and Digitalocean. If you don’t I guess this comes on top of that.

Disclosure: The Digitalocean link above includes a referral which subsidizes this blog.


MacBook Pro (eGPU) vs Hackintosh GPU

Apr 01, 2019

Image copyright © Blackmagic Design Pty. Ltd. 2019

I originally wanted to write a blog post about raving how great the new Blackmagic eGPU is. I wanted to tell you how much I like it and how easy it is to get a full desktop setup with only plugging in 1 cable. I wanted to rant about PC GPUs not being able to drive a 5K display. That is until I ran some benchmarks and oh man, those don't look great.

I ran the Blackmagic eGPU (not the Pro) against a Radeon RX 580 and a Radeon Vega 64 in a Hackintosh PC enclosure. And as you can see from the chart above the eGPU didn't fare that well in terms of performance against a traditional PC setup. The difference is staggering. The 700 EUR Radeon Pro 580 eGPU's performance is closer to the Intel Iris Plus 655's performance, that comes with my 13" MacBook Pro, then to a 4GB PC graphics card that costs around 150 EUR. If you are buying the Blackmagic eGPU, you are sure not buying it for the performance.

OK, the performance is not great, but here's the thing. You only max out a graphics card on a MacOS machine during A) gaming or B) photo or video editing or C) intense 3D graphics workloads. I can't think of anything else. If those 3 things is what you do, please don't buy an eGPU, buy the new 2019 iMac with a Vega 48 or the iMac Pro, or wait for the new Mac Pro that must be a unicorn by now judging by how long we have to wait for this machine. Buy the Blackmagic eGPU if you have a normal MacOS workload like office work, audio work, programming etc. Then it's great to only have 1 MacBook, you can carry around and put it in a desktop setup from time to time. You can have a 5K display (also not needed for gaming) and you can plug in additional hard drives into the eGPU and connect the whole desktop setup to the MacBook using 1 cable. For that it's great.

I haven't tested the Blackmagic eGPU Pro, but from what I see, I can't really recommend it. It costs around 1300 EUR and presumably won't increase the GPU performance by a lot. Stay with the lower end model.

And oh yeah, I also tested a simple HDMI cable using an HDMI/USB-C adapter on a 4K display and the performance was horrible. Glitches everywhere and only 30 Hz refresh rate.


My New Silent, Small Hackintosh for 600 EUR

Jan 12, 2019

hero

I had some components lying around from a machine I built a couple of months ago for using Ubuntu. The computer was housed in a 1U server case, but having this case on the desktop was horribly noisy. So, I looked around and tried to find another solution.

I found this Inter-Tech case on Amazon for 60 EUR. Apparently its not available anymore. You might find it somewhere else. It already comes with a 60W power supply.

Here are all the other components I used:

In total this built cost me 591 EUR. You might be able to use even cheaper components then me, however according to my last check, all components went up in price a little bit. You can't really compare it to the new Mac mini, since the Mac mini uses Intel 8th generation processors and I used a 7th gen processor. However if you spec out the Mac mini with 16GB RAM and 512 GB SSD, you end up at 1619 EUR, 1000 bucks more than my machine.

I installed MacOS High Sierra on it and managed to even configure a dual boot setup with Ubuntu 18, which is not that easy, because the Ubuntu installer always overwrites your EFI config. I managed to get everything but WiFi working, because the WiFi hardware on the motherboard apparently is not compatible with MacOS. You can however switch the M.2 WiFi module to a Dell DW1830, which should work. The whole install took me about 3 hours, but it was not the first hackintosh I built and I already had a working High Sierra installer USB thumb drive. If you are interested, you can accelerate your install by using my EFI configuration.

By the way, if you're wondering if the CPU cooler is not too small, I measured the thermals on Ubuntu using the s-tui tool and it's fine.


Instacast is Now Free and Open Source

Nov 22, 2018

I finally decided this morning to make Instacast free. There are a couple of reasons why, but mainly because I don't have the time anymore to really push the project forward. However, I know that there are a couple of die hard users that still really like it and I feel that I should be able to at least maintain it and keep it working. That's not the case however. That's why I am also making the source code of Instacast open source today, in the hope that the community takes over and keeps Instacast compatible with new versions of iOS and new devices. That would be wonderful. Otherwise, at some point I would have to remove it from the App Store.

You can find the whole source code over on GitHub. I will do my best to test and accept patches in a timely manner and from time to time publish new releases to the App Store.


What makes a Mac Pro a Mac Pro

Sep 12, 2018

What makes a Mac Pro a Mac Pro

I just listened to the Accidental Tech Podcast where John Siracusa and the other guys celebrated the 10th anniversary of his Mac Pro. A Mac Pro he bought in 2008 for $2400, that lasted to this day. A computer he still bought in the good old days when Steve Jobs drove the product development of the company. He couldn't have kept it for 10 years without the possibility of upgrading individual components.

It is no secret that I am critical of the today-Apple and its product decisions and price hikes. Especially how Apple handles the Mac these days. I am a die hard Mac fan of the old days. The Mac was always superior to the PC in my mind and it looked way better. This all changed with the advent of the modern 2016 MacBook Pro. The one with the dud keyboard, the soldered RAM and hard disks and without any useful ports. The one good product decision Apple made in recent years, was the modern iMac Pro. While it's expensive, it's a really good product, if you don't care about upgrading components. If you do care, you'll want a Mac Pro. And it's really sad how Apple treated their top-of-the-line computer during the last 5 years. The trash-can Mac Pro is an embarrassment in lots of ways.

Apple promised us in 2017 that they are working on a new Mac Pro model and told us in 2018 that we need to wait a little bit longer. In the mean time, I built my own Hackintosh and another dedicated Linux machine. It was a lot of fun, but also a bit of a chore, especially if you want to install an operating system like MacOS that is picky about its hardware. Doing that however I learned a lesson or two about modern computer hardware and how everything fits together. I now have a clear opinion what a modern Mac Pro should be. Apple: Don't ask iMac Pro buyers, ask Hackintoshers!

Obviously the new Mac Pro should be upgradable to a certain point. This has limits however, it's really not possible to upgrade processors over 5 years. At some point Intel will introduce slight incompatibilites that require a new mainboard. But one thing is clear, nothing should be soldered to the mainboard whatsoever! No processor, no RAM, no SSD. Please Apple, use a standard processor slot, standard RAM slots and standard NVMe M.2 slots for SSDs and give us 4 PCIe slots (!!! no Apple computer has PCIe slots these days). It should be possible to put in 2 beefy GPUs like the AMD Vega 64 and still have room for a Blackmagic DeckLink card or something similar. I feel like, if Apple puts in 4 M.2 slots for SSDs, they could get away with not adding SATA. SATA is slow compared to M.2 and hard disks take a lot of unnecessary space. If you need a lot of hard disks, you can always use a NAS connected via 10gig ethernet. The empty space in the case should be used by adding really big, slow and silent fans which are able to cool a top-of-the-line Xeon processor and 2 of the craziest GPUs. As far as ports go, the ports of the iMac Pro are fine: 10gig ethernet obviously, Thunderbolt 3 and a couple of USB-A ports! I also really like an SD-card slot but, I guess it's really dumb to put one into a case that is mostly hidden under the desk. Instead I think it could be a feature of any upcoming Thunderbolt 3 Cinema Display. Oh yes, and also give it a Space Gray enclosure with 1 LED for sleep mode.

If Apple can deliver that and maybe stay under $5000 for the baseline model, I'll ditch my Hackintosh in a heart beat.


Why you Should Build a Hackintosh

Jul 14, 2018

In 2013 Apple told us, that we should move from an all integrated tower style Mac Pro to a smaller machine that instead of putting under a desk, we should show off on top of the desk. The new Mac Pro was fast and had a decent graphics card, at least at the time. And it had Thunderbolt ports that in theory should have satisfied any need for extension. But in reality, this concept sucked. The machine was not upgradeable and had limited internal storage. You had to use the thunderbold ports for everything, display, external storage, dongles etc. After going through all that, you weren't able to see the Mac Pro anymore, because it was littled in cables and your working place became really noisy from small fast spinning fans inside external enclosures.

Fast forward 5 years and Apple still doesn't have a solution that satisfies customers that have extensive need for customization and specialized workflows. During the time of trash can Mac Pro, I worked on a 5K iMac, because I really liked the hi-resolution display. But hiding away all those cables was a chore. After Apple showed us the future of professional hardware with the iMac Pro, I was fed up with the situation and I started to investigate the possibility of building my own Hackintosh. Putting all the hardware together was the easy part, making macOS work was tough, but I did it.

Looking back on 7 months working with, it I don't regret it at all. I was able to put 2 extra SSDs and 2 extra big hard disks into it (imagine how fast Time Machine is), added a beefy graphics card and recently installed a Blackmagic DeckLink SDI 4K PCIe card. And all that internally in an unobtrusive tower case that sits under my desk and hides the bulk of cables inside it. PCIe... I can't really understand, why Apple really has NO hardware in its line up that supports adding PCIe cards. There is so much great hardware available on the market that is inaccessable to Macintosh customers. Boggles my mind.

I originally thought that I would sell my machine as soon as Apple brings the pre-announced new modularized Mac Pro, but I am not so sure anymore. I just love my Hackintosh. Second best machine I ever owned (best was the 2012 Mac Pro). Apple: Here's my list of things the 2019 Mac Pro needs on top of the iMac Pro hardware:

  • 4-6 internal 2.5" hard disk slots
  • 4 PCIe express card slots
  • User exchangable RAM
  • Upgradable graphics card (just use one of the 4 PCIe slots)
  • 5K Display P3 external display
  • Don't forget the freaking USB-A ports!

Apple, if you do that, I am on board again.


Why the Blackmagic Pocket Cinema Camera Is Not a Good Vlogging Cam

Apr 16, 2018

Blackmagicdesign Pocket Cinema Camera 4K

On NAB 2018 Blackmagicdesign announced a new camera slated for release in the Sept 2018 timeframe. It's the successor of the 2014 released Pocket Cinema Camera, the Pocket Cinema Camera 4K. Much like the successor it features a somewhat pocket sized form factor and a Micro Four Thirds mount. But unlike the old model it now features an actual MFT sized, 13-stop sensor with dual native ISO much like the GH5s. For all we know it could actually be the same sensor. It records Prores and Cinema DNG RAW to SD and CFast cards. It also features a large 5 inch, 1000 nits bright display on the back of the camera that should be great for focusing 4K footage.

That all sounds great and that's precisly why I preordered it. However there are some quirks that might turn you off. For one it features a record button at the front that's accessable with a thumb for when you're recording yourself. However the display is fixed on the back and the camera is kinda heavy with its projected 750g. To use it as a vlogging camera, you would actually need to mount another display on top that can be rotated to frame yourself during recording. The battery with a projected framing and recording time of 45 to 60 minutes is not that great, which means you also need to carry an extra battery pack. This makes the setup heavy and hard to carry around. On top of that the camera does not have a stabilized image sensor which will make handheld footage quite shaky. I also doubt that the camera fits on most lightweight gimbals like the Zhiyun Crane due to its increased horizontal size of 18 cm (7 inches, the Canon 1D X is about 16 cm).

Vlogging is all about recording yourself quickly whenever you feel like it, but all these downsides make it hard to use as an actual vlogging camera. The workflow of Cinema DNG is not ideal for a quick turnaround and image quality and cinematic look is not that important for a vlog. You're better served with a small and lightweight Sony or Canon camera with a flipout screen like the RX100 or the EOS M50.

The Blackmagicdesign Pocket Cinema Camera 4K is not a vlogging camera and not an action camera. Instead will be great for stationary setups like interviews, landscape and weddings and that's how you should use it.


ProRes RAW is Here

Apr 09, 2018

Apple just announced ProRes RAW, a new high-efficiency RAW codec that enables instant playback and editing without the need for any conversion. The performance of ProRes with the flexibility of RAW, that is what Apple promises. Apple created a codec that's supposed to be as easy to use as the existing ProRes options but with the flexibility of RAW. ProRes RAW allows to import, edit and grade video with RAW bayer data straight from the camera sensor without slowing down the edit.

There are two variations of ProRes RAW. ProRes RAW is the equivalent of ProRes 422 HQ in terms of data rate. ProRes RAW HQ is the equivalent to ProRes 4444XQ. The data rate of ProRes RAW HQ is just a fraction compared to uncompressed 12-bit RAW. Compression-related visible artifacts are very unlikely with Apple ProRes RAW, and extremely unlikely with Apple ProRes RAW HQ.

Multiple codec launch partners have announced support in their products. Atomos provides recording to ProRes RAW with the Shogun Inferno and the Sumo19 with the following cameras:

  • Canon C300 Mark II
  • Canon C500
  • Sony FS700
  • Sony FS5 / FS5 Mark II
  • Sony FS7/FS7 II
  • Panasonic Varicam LT
  • Panasonic EVA1

DJI will provide recording to ProRes RAW with their Zenmuse X7 Super35 camera, that can be attached to a gimbal or under an Inspire drone.

Unfortunately Blackmagicdesign has not announced support for ProRes RAW in any camera yet, but could happen later this year via firmware updates.

ProRes RAW editing is available with Final Cut Pro 10.4.1 and requires at least macOS 10.12.4.


Is the Nokia Steel HR Smart Watch an Apple Watch Killer?

Apr 03, 2018

Hero

Around 2 weeks ago, I saw an advertisement on a train station for the Nokia Steel HR smart watch and on the bottom it said “holds 25 days of battery charge”. It looked good, so I bought it to test it out. I immediately thought, that can’t be good. 2 days later the watch was on the mail and I immediately put it on. Then I realized the battery was dead. The watch comes with a USB charger adapter and uses 2 pins to charge the watch instead of induction charging. It took about an hour and the battery was at 100%. I put it on and frankly, I only took it off my wrist during shower times since.

The watch technology has been bought by Nokia from a company called Withings which also had a smart watch called Activité. I am guessing this new model is a somewhat successor of the same technology. The HR in the name stands for heart rate. The watch periodically measures your pulse and you can also operate it in a continuous heart rate mode during workouts. It also tracks your steps, your daily mileage, your calories burned, the current date and it offers a smart alarm feature that uses the integrated sleep tracking to wake you up when you’re not in a phase of deep sleep. And the best part is, that it shows the time… every time, because it features actual analog handles. The watch is connected to your iPhone or Android smartphone via bluetooth and once you open the “Health Mate” app, it synchronizes the health data to the phone. On the iPhone the app is also integrated with HealthKit.

I am really impressed. Not only does the watch look good with its circular watch face, it also works well. I couldn’t find any bug or issue with it so far. And the battery really holds a long time. After around one and a half weeks of 24 hour use, the watch still has 50% charge left. This small fact really frees you from bringing an extra charger on a trip. My only wish was, that the watch would display a second timezone. This would really help during travel or when working with oversees colleges.

Do I think it’s an Apple Watch killer? No, of course not, but I think it’s a contender to be worth checking out. The Apple Watch still has a lot more features and apps, although the usefulness is arguable. For sports and workouts the Apple Watch is and will remain the best watch, but for daily and casual use, I think I prefer the Nokia Steel HR. It offers a lot of the same benefits of the Apple Watch, but has a much higher convenience factor and is much more fashionable at least to my taste.


Workaround for Buggy DNG Handling in macOS

Mar 04, 2018

Yesterday I released a new version of my video post processing tool Colorcast. Among other things this new version includes support for Cinema DNG. Cinema DNG is an industry standard to store RAW video. Sometimes there are tools that convert the vendor RAW format of the camera to Cinema DNG and other times Cinema DNG is directly produced in camera, examples for this is the Blackmagic Cinema Camera lineup and the DJI X5R camera that can be mounted on a DJI Osmo or under a DJI Inspire drone.

During development of that feature, I had to deal with a number of bugs in Apple's implementation of DNG. There are configurations of DNG files that simply to not render correctly in Finder, QuickLook, Preview and even Photos. The reason for that is a lack of correctly handling those configurations in the underlying Apple API. I wasn't able to pinpoint the number of bugs exactly, but I think there are basically 2 main issues:

  1. Problem with handling bitdepths other than 14 bit RAW
  2. Problem with tiled RAW buffers

Buggy Tiling

The first problem causes 10 or 12 bit images to draw very dark. 12 bit 2 stops and 10 bit 4 stops darker as normal. The second problem just produces weird drawing issues, I can't really explain. The solution however is quite simple. You need to convert the RAW buffers to 14 bit and untile it. Sounds easier than done. You basically need to decode the whole DNG image yourself, convert the RAW buffers, convert some metadata like linearization tables and write out a new DNG image. And that is exactly what I have done. Around 2000 lines of code, just to get the images properly displayed. I hope that with macOS 10.14 Apple comes around and fixes those issues (Radars: 37538394, 31032063, 30754552).

Nevertheless, I found this conversion method so useful, I also created a small batch conversion application called DNGDoctor and put it into the Mac App Store. Check it out. And if you have a graphics application that deals with DNG images, and like to ship this fix in your app, just let me know.


Colorcast 0.5 Adds Support for Cinema DNG, Anamorphic De-Squeeze and Slow Motion

Mar 03, 2018

It's time for a new update to Colorcast. I am very pleased on how the application is coming together. In this version, I added support for Cinema DNG (folder based). Cinema DNG is an industry standard to store RAW video. Sometimes there are tools that convert the vendor RAW format of the camera to Cinema DNG and other times Cinema DNG is directly produced in camera, examples for this is the Blackmagic Cinema Camera lineup and the DJI X5R camera that can be mounted on a DJI Osmo or under a DJI Inspire drone.

Additionally I added the option to de-squeeze anamorphic video. Anamorphic video has been recorded in camera using anamorphic lenses. These types of lenses do not scale the x and y axis of an images the same way, but for example cram an ulta-wide shot into a 16:9 image. In post you then assign a new aspect ratio that fits the natural scale more closely. Most of the time the image then gets wider. Examples are 4:3 to 16:9 or 16:9 to Cinemasope 2.35:1.

For this release I also moved the export settings from the preferences panel into the export panel. This means that the export settings can now be checked and changed before every export. They can now be different for every project. Additionally I also added a frame re-timing option. In the export panel, you can now choose to change the frame rate. Using this option, you can change 60 fps video to 24 fps for example and thus get a gorgous slow motion shot.

There are also a lot of smaller updates which can be checked out in great detail on the Version History page.


Open-Source Objective-C API for Magic Lantern

Feb 06, 2018

Today I updated my currently in development app Colorcast to version 0.4 and included a RAW engine and added support for Magic Lantern video files. You can read more about this release here.

I also like to introduce you to an open-source Objective-C project and API (no Swift yet) for reading Magic Lantern video files and converting the Magic Lantern specific RAW format to DNG. Magic Lantern is an open-source project published under the GPL license. To be able to comply with the license and include support for it in a commercial product at the same time, I developed a binary that runs as a separate process and communication between the external process and the main app binary is done via inter-process communication. I published the project on GitHub. Please check it out, watch it, star it, fork it and spread the word. It would be great if other projects can also benefit from my work and thus spread the word about Magic Lantern, which in my opinion is a great project.

Included in this project as well is the beginning of a second macOS app solely dedicated to batch processing Magic Lantern files like converting to Cinema DNG, compressing or decompressing, etc. I'd be happy to find some collaborators.


Colorcast v0.4 Includes RAW Engine And Supports Magic Lantern

Feb 06, 2018

I am happy to announce that I came around finishing up the next step for Colorcast, version 0.4 which brings general support for RAW video and includes support for Magic Lantern video files.

Screenshot

Magic Lantern is a free software add-on for Canon DSLR cameras that among other things enables users of Canon DSLRs to record RAW sensor data to a custom video file format called MLV. MLV files include a sequence of RAW images, audio samples and a bunch of metadata. Colorcast can read those RAW images and uses its newly added internal RAW Engine to develop high dynamic range images, that can then be color graded like any other video. Support for other RAW video formats like Cinema DNG will be added in one of the upcoming releases.

An option for displaying False Colors has also been added. False Colors, like the luminance waveform, is an easy way to quickly judge the exposure of parts of your image. By comparing the color of an image area to the scale on the left while adjusting the exposure, shadows and highlights, you easily get correct exposure without relying on display brightness and correct ambient room lighting.

We also vastly improved the Sharpening & Noise Reduction tool. It now uses edge detection to not blur edges during noise reduction or sharpen noise in areas. You can adjust the edge threshold and feather to optimize the filter results.

There are also a lot of smaller updates which can be checked out in great detail on the Version History page.


Thoughts on the DJI Mavic Air

Jan 25, 2018

DJI Mavic Air

On Jan 23, 2018 DJI introduced a new drone to its consumer lineup, the DJI Mavic Air. Product-wise the Mavic Air sits between the smaller DJI Spark and the DJI Mavic Pro. The Air is in many ways a much better drone than both of those products.

While it has the same camera sensor as the Mavic Pro, it however records with 100 mb/s instead of 60 what the Pro does. This is a significant upgrade and produces videos with less compression and higher visible quality. Anybody who used the Mavic Pro before knows that especially with 4K, the image quality quickly falls apart.

It also looks that when folded up the Mavic Air is even smaller than the Spark, because the Spark doesn't have foldable legs. If price isn't any concern for you, you should not consider buying the Spark anymore. Apart from the price I don't see any upsides to the Spark. It is the much lesser product.

But the Mavic Air even makes the Mavic Pro a hard-sell now. Apart from the longer flight time, which can be offset by just having more batteries, I don't see any other advantages over the Air.

Even though the Mavic Air looks great and seems like an awesome drone, I am holding out for the update to DJI Mavic Pro sometime this spring or summer. My guess is that DJI will give it the better camera processing, 16 GB internal storage and the rear collision detection sensors, at least they should.


Why I bought a Sony Alpha 7 Mark II in 2018

Jan 24, 2018

Yes, it is 2018 and I bought a 3 year old camera new and here is why. I've always been a Canon shooter. I started around 15 years ago with a Canon anolog single-lens reflex (SLR) camera. I took it on a couple of trips and I quickly switched to a Canon EOS 350D 2 years later, because the ability to quickly check your images was priceless. This 8 megapixel camera served me very well for a couple of years and in 2015 I switched to the Canon 5D Mark III.

The Canon 5D series cameras are awesome and together with a great lens they produce amazing images. But especially in combination with a decent zoom lens such a device is heavy and you think twice of bringing it to your hiking trip to the mountains. The Sony mirroless cameras are much lighter, especially in combination with a landscape lens like the Sony Zeiss 35mm F2.8 which only weighs 120g. This lower weight makes it possible to carry more optional gear like a travel tripod.

I sometimes shoot pictures of my family especially in the evening time when there is not a lot of light. With the Canon 5D, I always had to use a flash. While that works, the images never looked very natural. With a Sony sensor, you get by with a lot less light and a higher ISO setting. In combination with a fast lens, you get amazing images without a flash even in low light situations. Additional the Sony Alpha 7 Mark II has electronic image stabilization built-in which helps with longer exposures in handheld shooting situations, although it doesn't help with fast moving kids.

Compared to the Sony Alpha 7R series of cameras, the Alpha 7 only shoots 24 megapixels, while the 7R shoots 42. But in my mind the 24 megapixels are plenty to work with and the 42 megapixels are kind of overkill and only useful for professional landscape photographers who want every little detail in an image. For any casual photographer like me, the 24 megapixels of the Sonly Alpha 7 is more than enough and it compares to the 5D Mark III in this regard.

Before purchasing the Alpha 7, I also checked out the Sony Alpha 6500, because it has most of the features of the Alpha 7, plus it can shoot video on 4K. However since I mostly wanted a camera for stills, I liked to have a fullframe sensor over an APS-C crop sensor and all the benefits this offers. For one you get a lot more shallow depth of field with a fullframe sensor than with a crop sensor and you have a lot more flexibility when it comes to lens selection. I also bought the Fotodiox Pro E-Mount to EF-Mount adapter with auto-focus support, which allows me to use all my old, but awesome Canon lenses. You don't get the full AF performance with an adapter, but in practice I found that it's good enough.

Last I want to mention the price. I got my Sony Alpha 7 for 1300 EUR of Amazon and Sony offered 200 EUR cashback. The above mentioned Alpha 7R is around 3000 EUR and you can get the Alpha 6500 for 1300 EUR. For me the Alpha 7 Mark II simply offered the best value for the price.


Using Metal Performance Shaders with Core Image

Jan 18, 2018

Core Image is a great Apple technology for manipulating images using the GPU. I am using it extensively in Colorcast, my video post-processing tool for macOS. With Colorcast you can quickly color correct and color grade video footage you've recorded with a video camera. Doing this it is very helpful to have something called video scopes. Video scopes let you see the image in a more analytic way. You can for example directly see if the image is correctly exposed or if the white balance and the skin tones are correct. There are multiple types of video scopes and some of them are already integrated in Colorcast.

Prior to version 0.3.1, these video scopes where calculated on the CPU, since with Core Image kernels you can only calculate image content on a per-pixel bases, which is not ideal for something like that, as I'll explain later in this post. But in macOS 10.12 and iOS 10.0, Apple added a special kernel type (CIImageProcessorKernel) to Core Image, which makes it possible to integrate Core Image with other image rendering technologies, like Metal Performance Shaders (MPS). Metal Performance Shaders offer a lot more flexibility than just plain Core Image kernels.

Let's take an RGB Parade as an example and explain what is needed to calculate an image like that.

RGB Parade

An RGB Parade is a video scope, that renders a waveform of the Red, the Green and the Blue channel side by side. Every pixel position in an image has an X and a Y coordinate associated with it. The waveform diagram projects the X position of the pixel on the x axis and the actual pixel value on the Y axis. The intensity of the diagram pixel hints at the overall count of pixels with that particular pixel value. Cinema5D has a good blog post that explains how to use these scopes. Since rending a pixel in the waveform involves counting the number of pixels that have Y as there particular value, you can see that doing this for every possible pixel is quite time consuming. An image with 512x512 pixels would need 512 times more time to render than any normal color filter.

And this is where Metal Performance Shaders come into play. You can pass an integer buffer to the metal shader, that has the same size as the image pixels.

kernel void
scope_waveform_compute(
    texture2d<float, access::sample> inTexture [[texture(0)]],
    volatile device atomic_uint* columnDataRed [[buffer(0)]],
    sampler wrapSampler [[sampler(0)]],
    uint2 gid [[thread_position_in_grid]]
)

For every pixel of the source image, you increase the integer at the correct position in the buffer by one, but make sure to do that atomically, since the shader function runs in parallel on the GPU for every pixel.

ushort w = inTexture.get_width();
ushort h = inTexture.get_height();
ushort hmax = h-1;
float4 srcPx  = inTexture.sample(wrapSampler, float2(gid));

ushort y = (ushort)(clamp(0.0, (float)((srcPx.r) * hmax), (float)hmax));
atomic_fetch_add_explicit(columnDataRed + ((y * w) + gid.x), 1, memory_order_relaxed);

In a second render pass, you take all those integer values and write the correct color information into the texture of the waveform diagram.

ushort w = inTexture.get_width();
ushort h = inTexture.get_height();
ushort hmax = h-1;

uint y = (uint)(clamp((float)(hmax-gid.y), 0.0, (float)hmax));
uint cid = (y * w) + gid.x;
uint red = atomic_load_explicit( columnDataRed + cid, memory_order_relaxed );
[...]
float4 out = float4(clamp(red / 5.0, 0.0, 1.0),
                    clamp(green / 5.0, 0.0, 1.0),
                    clamp(blue / 5.0, 0.0, 1.0),
                    1.0

This method only takes 2x the time of a normal color filter, which is not that bad.

The complete code on GitHub includes the Core Image filter, the CIImageProcessorKernel subclass that applies the shader to the Metal texture and the shader code itself. The Core Image filter can be used as any other filter. Make sure to create the image using a Metal texture and render the CIImage inside an MTKView subclass.


Night-Mode For Your iOS App

Jan 15, 2018

Night-Mode or Dark-Mode has been a favorite feature to request by users for all kinds of apps. The reason why is obvious. You use your phone in all kinds of situations day and night, and during the night your eyes are accustomed to less light. Looking at a glaring smartphone display can be very jarring and you might have to turn down the display brightness. But that’s not a good solution. Everything on the display just becomes more difficult to make out. With a Night-Mode or Dark-Mode feature however the color of the text and the background sort of becomes inverted and it’s much easier on the eye at night.

Since there is no dedicated night-mode setting in iOS (Android may have that), app makers reside to all kinds of techniques to switch the mode between day and night automatically. A method I often see is using the ambient light sensor. This method however can be very annoying in situations where it’s not light nor dark and often apps switch back and forth multiple times. When I added this feature to Instacast, I wanted to go a different route. I wanted Instacast to switch only 2 times a day, in the morning and in the evening. So, I came up with what I think was a unique method at the time.

Instacast is not measuring the actual light in the room. Instead it asks for your broad location data and depending on your actual location on the planet, it calculates when the sun is setting or rising approximately. Now you might say, that querying the location and triggering GPS and thus draining the battery only for switching user interface colors is wasteful, and you’re right. That’s why Instacast is only asking for your approximate location. This location is already stored by the phone when it is connected to a cell tower, so only already stored data is passed to the app. This way no actual sensor is fired at that time. After all, for the calculation of the sun angle, it doesn’t really matter if your 100 kilometres here or there. Also, please don’t look at the sun and wait for Instacast to switch the night mode setting exactly on time. The actual calculation is only an approximation. It does not account for terrain height or other physical circumstances, like the earth not really being sphere, but a potato.

So far this method was a huge success. Nobody ever wrote in and complained about it being unreliable or false. I’ve put the daylight calculator on Github if you like to use it in your app.


What’s Color Grading and Why You Want That

Jan 15, 2018

Color grading is the process of altering the colors of a movie, a video or a still image for the purpose of either correcting the colors or to make them artistically more interesting. There are a lot of ways and applications to do just that. Most of the time, you color grade your image material manually, because automatic methods of modern cameras are just not good enough.

A good example is capturing all the dynamic range of a photo sensor. Most cameras auto-expose an image in a way that cuts out a lot of color information in the blacks and in the highlights. Either the sky is blown out or the shadows are just a dark blob. To circumvent this problem, most higher-end cameras have log image profiles. Canon cameras have C-Log, Sony products use S-Log and Panasonic is using V-Log, but even on smartphones there are are apps like FilmicPro which capture more detail using their own log profiles. Light information is read from the photo sensor linearly. Dark is 0 and White is 1. But that’s not how your eyes are seeing things. Your visual cortex processes light logarithmic like, meaning the eyes are more sensitive to darker light sources than lighter once. A log image profile puts more color information into darker image areas and compresses lighter areas and thus captures more detail while only blowing out extreme highlights. Looking at such an image however is not pleasing. The image mostly looks grey and doesn’t have a lot of contrast.

This is where color grading software comes into play. You can use this kind of software to add contrast, darken or lighten up the image or boost the saturation. Sophisticated apps like Davinci Resolve give you lots of tools to deal with all kinds of aspects of color grading. You want to expose the image correctly, show lots of detail in the shadows, don’t blow out highlights, make the skin tones really nice and maybe also give a scene an interesting look, like teal and orange. All these tools however make using these apps a chore and you need to learn and experiment a lot before getting good results.

My goal with Colorcast is to make this process easier and more intuitive while not dumbing down the tools too much. If you are a beginner and just make yourself familiar with video or if you are an aspiring YouTuber, who just want a quick turnaround, I think Colorcast can help you to make your videos better and more interesting.


My Review of Gearo.de

Jan 09, 2018

When I started writing software for developing video footage last year I quickly had the need for hardware to test the software with. I admit it, I have GAS, so this was a welcome occation to give into my desires and buy some stuff. That was fun at first, but very quickly developed into a financial problem, of course. So I had to dial it back. I had to find a way to test a lot of equipment and not ruin me financially doing so. I searched around where and how to rent video and photo equipment. And that's were I came across Gearo.de.

Gearo is a German startup that operates in Germany and Austria. It works like Airbnb, but with photo and video equipment. If you have some equipment lying around at home, you can use this platform to start renting it to other people for one or more days. And if you like to check out a certain camera or a particlar lens without buying it, you can rent it from somebody in your local area.

I liked the idea and created an account. The setup process is quite painless and fast. Within minutes you can start renting stuff. Once you've decided for an item and a certain renting period, you request a rental. The owner of the gear then approves or denies the request. I had a couple of denies at first and started to get annoyed, but the Gearo staff is very kind and will help you find an alternative. So far I rented a Panasonic GH5 and a Sony Alpha 7s.

I also looked around in my closet and checked what I can rent out. You can check out my stuff on my profile page. There haven't been a lot of requests yet, but I already rented out my Zhiyun Crane v2 two times and earned about 60 EUR so far. Once you have an agreement with the equipment owner, you take the car and just pickup it up. The renting process on site is very quick. You basically make a picture of the gear, note the serial number and the id of the renter and both sign the contract on the gear owner's smartphone. So far it was a lot of fun for me. I met a lot of creative people with great and inspiring projects and ideas.

It's too bad that the service only operates in Germany and Austria so far, because I think that it's a great idea that connects creative and inspiring people around the world. Keep up the good work, Gearo!


Everything That's Wrong with Hackintosh

Dec 27, 2017

A week ago I wrote about my Hackintosh build. At first I was very enthusiastic about building my own computer. Everything looked good on paper. I did a lot of research on the interwebs and watched a lot of YouTube videos. Everybody was always bragging about performance and the low cost, but nobody was telling the whole story. This is my attempt to do just that.

Price

It's correct that on paper the sum of all components do cost less than a comparable Macintosh, but this does not account for the hours you have to invest in building the thing. It's not just skrewing all the hardware components together, it's also the installation of macOS and especially getting all the hardware components to work correctly. The whole build took me at least a full work-week. You do the math. If I would have worked for a client in that time, invested the income in Apple and substracted the rest value of my current iMac, I could have bought a new low-end iMac Pro.

Display

Another big price component that is never mentioned is a decent screen. There is really no good alternative to a 5K LG dispay at the moment. And a normal hackintosh is not able to run a display with 5K resolution. That has something to do with the Displayport spec and how 2 streams are multiplexed for 5K. It is theoretically possible to build it with a GC Alpine Bridge, a thunderbold PCI card that takes 2 displayport streams and multiplexes them into a thunderbold output stream. But judging from the forums, nobody has ever tried it before and the hardware is not easy to get. That means you are stuck with a 4K display and 4K displays for PCs do not have the 5K LG display's high resolution. I ran with the Dell UP2718Q UltraSharp 27 4K HDR Monitor, which costs around $1500. In terms of colorspace and brightness it's competitive to the LG Ultrafine displays, but it's expensive of course.

Graphics

One of the reasons for building a hackintosh for me was using a beefy graphics card. There are multiple options. You can go with Nvidia and need to install drivers and don't get good OpenCL performance (Final Cut Pro) or you go with AMD. I decided for AMD, because I thought that I don't need to fiddle around with drivers. In reality that's not true. Only a hand full of AMD graphics cards seem to work in High Sierra. The AMD Vega 64 works well, but runs the fans at light speed. In the end, I settled with a AMD RX 580 for now, which is the same graphics card that is running in a new high-end iMac. So that's that. I hope to upgrade to Vega 64 sometime in the future. I wasn't able to get the internal Intel GPU running. This process is really to cumbersome and involves a lot of kernel panics. No time for that.

Audio

Depending on what motherboard you use, you need to inject different kext modules. It's amazing that there are people who care enough to make this work. High Sierra however broke the support of a lot of audio drivers. I really couldn't get it to work after 8 hours of trying different drivers, version, etc. I ended up with attaching an M-Audio USB interface to the USB port. Works fine.

USB

Talking about USB. It mostly works for me, but reading through the forums, I get the impression that USB can also be a major source of headache. Cable-bound keyboards and mice do work, audio as well, but at first I wasn't able to mount external hard drives. There was a solution for that however and it took me a while to make it work, but external disks do mount now. However I can't keep them connected to the PC at all time, because at some point the machine just freezes, which is not the case when the external drives are not connected.

Bluetooth

Bluetooth also mostly works. I purchased the IOGEAR Bluetooth 4.0 USB Micro Adapter, because I read that this is the best solution. And yes, Magic Keyboard and Magic Mouse do work, also AirPods, however running external hard drives on the same USB bus can cut bandwidth from the bluetooth adapter and the mouse gets a noticable lag. This can go so far as a total shutdown of the bluetooth adapter. Disconnecting and reconnecting it again mostly workarounds that issue.

Hard drives

Disk space is a big upside and I can't really complain about that. I am using a Samsung 960 Pro on the M2 slot and 5 hard drives that are connected over SATA. And I love it. It's really nice to have a lot of disk space and not have a loud RAID on the desk. SATA is also working very reliably so far.

Conclusion

In summary, I would never recommend to anybody to build a hackintosh unless he has the time and energy to make it work. I can say, a hackintosh is not about the money, it's about the challange to make it work. If you need a machine for your professional work, get an iMac or an iMac Pro. Personally, I love to have a lot of disk space inside the machine. My hope is that Apple comes out with a new modular and upgradable Mac Pro in 2018 which makes me want to demote the hackintosh to run it Windows only.


Colorcast Alpha v0.3 Available

Dec 21, 2017

I am happy to make a new version of Colorcast available today.

I spent the last couple of months digging deep into Apple's video frameworks and its Metal graphics engine. And the result is quite nice. I was able to integrated 16bit graphics processing in preview and export for video footage with 10bit or higher color information. Right now ProRes and HEVC is automatically detected. High bitdepth support for other formats will be added over time. 16bit color transfer internally is done via Metal Performance Shaders and should be quite fast.

I also added support for basic and Apple Pro Apps metadata. Certain cameras like the Blackmagicdesign Cinema Cameras are able to write this metadata directly into the recorded footage. Colorcast can now import that metadata, make it available for editing in the info pane and can export the edited metadata, too. I have plans to improve metadata handling over time as well. Stay tuned.

The export has been improved as well. It now maintains audio quality and clean aperture settings. It uses Rec.709 colorspace for 8bit and Rec.2020 colorspace for high bitdepth footage. There are also a lot of smaller updates which can be checked out in great detail on the Version History page.


RX Vega 64 Hackintosh for High-End Video Work

Dec 19, 2017

During my work on the Colorcast app, I was testing ProRes decoding into 16 bit Metal textures instead of the usual 8 bit Core Image workflow. After all if you have an expensive camera that can record ProRes in 10 or 12 bit, you don't want your color correction app to downgrade your footage to 8 bit and thus loose a lot of color information. From a development perspective, getting this to work with Apple APIs is not easy and involves developing custom Metal shaders.

Aside from that, the performance I was getting on my iMac 5k (late 2014) and on my MacBook Pro (mid 2015) was not great. Playback didn't come any close to realtime. I first attributed that to the slow graphics chips Apple is integrating into their lineup traditionally, but more testing revealed that the actual bottleneck is I/O bandwidth and RAM speed. It was clear to me that my iMac was simply not suited for 4k color editing. It was time for a new beefy machine. After some research later I narrowed it down to 2 options, either get the new 2017 iMac 5K or the new iMac Pro. I don't know anybody that owns a 2017 iMac 5k and the iMac Pro isn't out yet. So I wasn't able to test performance on an actual machine and get a better understanding of what is really needed here.

After comparing hardware specs and configuring it out in the Apple Online Store, it really came down to the price. A new iMac 5K would have cost me 3600 EUR. The new iMac Pro with a 1TB SSD option would likely have cost me 5800 EUR. After seeing these prices, I also configured a true high-end PC that contains a mix of both models. This machine came down to 2300 EUR excluding the display. If you add a really high-end 10bit HDR display you end up with 3700 EUR for the PC, however the PC contains an RX Vega 64 graphics card (11 tflops) and the iMac comes with a Radeon Pro 580 (6 tflops).

Very quickly I ruled out the new iMac Pro. It is way too expensive and really overkill for my purposes aside from the fact that it's a new design and who knows what's wrong with it and its thermal footprint. So the decision came down to a new iMac or the PC. I did a lot of research into the Hackintosh thing and it seemed to me that it's possible to build a really great PC and run macOS on it and get a GPU performance that is unheard of in Macs (said but true). So I figured the risk was worth it.

Here's a complete list of all components I used for the build:

  • Gigabyte GA-Z270X-UD3 motherboard
  • Intel Core i7 7700K 4.20GHz processor
  • Gigabyte Radeon RX Vega 64 graphics card
  • Samsung SSD 960 PRO Series NVMe 1TB
  • Corsair AX Series AX760 power supply
  • 32GB Crucial Ballistix Sport LT DDR4-2400 DIMM RAM
  • Noctua NH-D15 Tower cpu fan
  • TP-LINK Archer T9E AC1900 WLAN Dual Band PCI-E Adapter
  • IOGEAR gbu521 W6 Bluetooth 4.0 USB
  • Corsair Carbide Quiet 400Q case

components

That's a lot of stuff and you have to assemble everything youself. In my case I must say that my last PC build was over 20 years ago and I really didn't have any idea what I was doing. However after reading through the manuals and watching a couple of YouTube videos, I managed to assemble the thing in about 3 hours (PC guys are now rolling their eyes). Turning it on for the first time and not starting a fire was a really great feeling. The system installation process is fairly simple, at least with the hardware configuration above.

Here's quick rundown of the installation process:

  • Download macOS 10.13.2 from the App Store.
  • Copy the installer onto a USB thumb drive using a special tool inside the installer package.
  • Download the latest Unibeast from the tonymacx86.com website.
  • Use Unibeast to add the EFI bootloader to the USB thumb drive.
  • Setup your BIOS correctly.
  • Start the macOS Installer from the bootable USB thumb drive.
  • Format your hard drive using Disk Utility.
  • Continue installing macOS High Sierra.

And that's pretty much it. There are a couple of details you need to know for troubleshooting (like preventing APFS conversion, FakeSMC, EFI mounting, etc.), but writing all this down is too much for this blog post and shouldn't be necessary anyway with this build. The Hackintosh booted without any problems.

The graphics card is working out-of-the-box with caveats. Apple is adding support for the RX Vega 64 right now and the driver is improving with every macOS release. Prior to 10.13.2 it head some OpenGL bugs, which are fixed now. However the GPU fans are still spinning at full speed and the PC is restarting occasionally when using the GPU extensively like with the Unigine Valley benchmark. 9to5mac had similar issues with the Vega 64 mounted inside an external Thunderbolt enclosure.

I also could not get the on-board audio to work unfortunately. Sound preferences is displaying audio ports, but neither input nor output audio works. I managed to get it working through a simple USB thumb audio interface. Wifi using the TP-Link PCI card also works flawlessly. There is really no need to install any additional kexts.

I am quite happy with it so far and I hope the remaining GPU issues get fixed with the next macOS updates. I have yet to test bluetooth, but from what I read it shouldn't be a problem to get Handover and AirDrop to work (at least as bad as on the Mac). I also still have to test Colorcast, my color correction app on the new hardware. If you like to get updated on my hackintosh build, you can subscribe to my updates on Twitter.

UPDATE Jan 26, 2018:
The AMD RX Vega 64 is working on 10.13.4 Beta and is silent.


Colorcast Alpha v0.2 Available

Sep 07, 2017

I like to give you a quick update about the development process of Colorcast.

Over the last week, I completely changed the layout of the apps' interface. The clips have moved to the top and the table layout is gone. I think it's much easier to select clips using thumbnails. With the added space at the bottom, I moved the scopes to the bottom right of the project window and with it gave them a lot more space. It is now easier to identify small details in the scopes. This has the nice side effect of giving the actual preview image the big spot in the middle of the window. The preview is now bigger and you have more space for reference images. Overall I think the new window layout is much better than before and it makes working with the footage much more comfortable.

On top of that, I added a couple of features. I added an RGB Waveform scope, a sharping and noise reduction filter, and I upgraded the Basic Correction filter.

The Basic Correction filter is now the default filter for every newly imported clip. It got brightness and contrast controls, to more precisely control the tone curve of the image (actual tone curve controls are planned for a future update) and I added a new option to set the source color space of the footage, which quickly transforms the log image profile into a somewhat more normal colorspace. So far it supports Sony S-Log, GoPro Protune and Technicolor Cinestyle profiles. More profiles are being added over time.

Let me know what you would like to see and make sure to download the latest build.

Cheers,
Martin


First Alpha Version of Colorcast Available

Aug 31, 2017

I am happy to announce the first alpha release of Colorcast, my new app for lightweight color correction and color grading. What do I mean with lightweight? Color correction, color grading and color in general is a big topic. Professional film makers invest a lot of time and money in giving their film projects a cool and distinctive look.

If you are a casual film maker like me and you want to give your video a personal look or get the most out of the picture, color correction and color grading tradionally meant investing a lot of time in complex software like Adobe Premiere or Davinci Resolve. I like to change that. I like to build a software that can produce good-looking results in a short period of time. You should be able to plug in your camera or SD card reader, import your clips, apply some presets and maybe slightly optimize exposure and white balance and export everything in a batch to your video editor of choice. I like to build a tool for casual film making needs that goes beyond iMovie's simple color filters and at the same time is easy to use and understand.

Colorcast is not a finished 1.0 product yet. I am releasing this first alpha build because I want to invite you to be a part of this journey. I like to hear from all kinds of users what they like to see and what they like to accomplish. Please check out the app. It's a free download. Start playing with it and head to the support formular and let me know what you think and what you like to see in future releases.

Cheers,
Martin


Vemedio Product Development Has Been Discontinued

Jun 01, 2015

Due to economical reasons and to concentrate on new projects, I had to close my company Vemedio and discontinue all products.

Since Jun 2016 there is a new version of Instacast available on the App Store called Instacast Core. It has been stripped of all cloud related features, since the servers are not running anymore.

You can ask questions on Twitter. Licenses of all applications can be activated indefinitely.


Audio Books vs. Podcasts

Apr 16, 2015

Prompted by suggestions that I should read the new Steve Jobs book, I looked at the options and decided to listen to the audio book instead. So, I check the iTunes Store and purchased the book. It downloaded 2 files. Then I started listening to it via the built-in Music app. After 2 days of using the audio book option of the app, I am already fed up with it. The user experience is really bad. I can't image that there are actual people that use this. It seems like an afterthought and that there is nobody at Apple that looked at it for the last 6 years. There are constant problems with remembering the playback position. Scrubbing 8 hour audio files is cumbersome and imprecise. There is no support for chapter markers and bookmarks. But then all these problems got me thing about the medium.

Why are we using a dedicated podcast app for podcasts and a music app for audio books? That doesn't make sense to me. After all audio books are just longer podcasts. To me the medium is the same. Both contain spoken words you can't listen to in one run. You basically want to do the same things. All the problems and issue we see with consuming podcasts are actually amplified when listening to audio books. Audio books are even longer audio files and even less accessible. So I thought about better ways to listen to audio books.

I split the audio book into multiple files - one file per chapter. Then I created a podcast feed and added one episode for every chapter. This method allowed me to much better keep track of how my progress into the book was. Also podcast apps generally do not loose track of the current playback position. It is clear to me now that using a podcast like app for audio books presents a much better user experience than what is offered right now.

Of course podcast apps could also be made better for these use cases. I am thinking of something similar like 'News Mode'. I'd call it 'Story Mode'. If enabled a podcast app should reverse the sort order to 'Oldest First' and always keep the next episode downloaded. You'd start at episode #1 and the podcast app already downloads episode #2. You finish episode #1 and start playing episode #2 and the podcast app auto-downloads episode #3, etc. This feature would also be great when you want to re-listen to older podcasts starting with episode #1.

Of course audio books are not delivered as podcast feeds and I won't be doing this manually for every audio book I'll listen to. I am also not saying that they should be. All I'm saying is that we as podcast app developers should not only think about podcasts, we should also think about longer forms of audio content like audio books and audio magazines and how we can make that user experience better.


Rejected for Weak Linked Frameworks

Mar 21, 2015

I got an interesting Mac App Store rejection tonight I haven't seen anywhere else. My app submission was rejected to §2.2 - Apps that exhibit bugs will be rejected - for missing frameworks, which I weak linked into the application, but stripped out using a custom build phase in Xcode.

The scenario here is as follows: The app is already available for purchase outside the App Store and includes the Sparkle framework for dynamically updating the application binary. This is not necessary for Mac App Store distribution of course, so I removed all the Sparkle code from the app. Because I did not want to add a new Xcode target only for another build configuration, I set the Sparkle framework in the "Linked Frameworks" table to "optional".

xcode

Since weak linking frameworks and not shipping them seems not to be allowed (nothing in the App Submission Guidelines about that of course), you can't use this "Linked Frameworks" table in mixed build environments. What I'll do instead is create two Xcode Config files and manually hard link the necessary frameworks using the OTHER_LDFLAGS option.

Of course it would be nice if XCode could warn you about this issue during submission validation, so that you don't have to wait 6 days for Apple to tell you that.


Ideas for A Better App Store

Mar 19, 2015

Listening through Inquisitive #31 - Behind the App #5: App Review with Myke Hurley, I had some ideas about how to make the App Store much better, more sustainable for developers and less cluttered with crapware as it is today.

It's clear that the App Store as it is right now has a couple of fundamental problems, just to name a few:

  • App Review takes 7 days or more
  • App Review makes questionable decisions
  • App Store is filled up with crap software
  • App prices are not sustainable
  • App discovery is really hard

To address all these problems, it's clear that some mild adjustments are not good enough anymore. The App Store needs a fundamental change. The old Downloads section on Apple's website for Mac apps was in fact working much better for developers and was helping consumers to find great apps, because Apple tightly curated this section and only allowed higher quality apps.

It should be said that you can't really reject all the apps in the App Store, since the App Store is the only mechanism to distribute software on iOS. You need to have a basic mechanism for consumers to install any app as long as the app does not violate the law or contains serious security issues. But you also want to curate the App Store much better and hide all the crap. I am proposing a 2-level system to improve all that.

The 1st level would be, that you submit your app to the App Store and you get an immediate download link (like the direct iTunes link). You can start to distribute this link to your customers by means of your website, newsletter or whatever. Every app is approved initially and goes through a legal and security check within the next couple of days after which it could be taken down upon having issues, if the developer did not comply within a certain period of time. When installing using the direct link, the system would bring up a warning that the app has not be verified by App Store editorial, similar to what Gatekeeper tells you when you download a Mac app from the web.

The 2nd level would be to apply with your app for an addition to the App Store store front. This application could be treated much more thoroughly than it is today, because Apple wouldn't be under anti-trust pressure if they did not allow your app into the store front, since you can always distribute your app using the direct link. The effect would be that the App Store would not be littered with all kinds of crapware. It also would increase customer confidence installing apps from the App Store and I imagine that it would also raise prices of those app that would make it into the store front.

I think this 2-level system of App Store review would be much better than what we're facing today, both for the consumer and for the developer. And Apple would also benefit, since it increases the quality of the App Store product. This system would also increase the incentives for developers to make better apps, since they want to be added to the store front for maximum customer attention.

There are a lot of similar ideas out there, but at this point I have no hope of change anymore. The only thing we can do is keep talking about it.


Auto-Layout works

Mar 05, 2015

Working with Auto-Layout fulltime for 2 months assured me that the technology is actually working. You can use it exclusively instead of autoresizing now. I am glad to be able to say that about an Apple technology. That is not always the case these days.

Sometimes you have to use a trick or two, but the results are worth it (example: Instead of using setFrame: for dynamically changing the bounds of a view, you should change the constant of the corresponding layout constraint. The welcoming side effect: you can animate that!)

Be sure however to set view.translatesAutoresizingMaskIntoConstraints to NO. Otherwise you might end up with lots of conflicts. The translation of autoresize masks is a bit useless, if you ask me. Either you use Auto-Layout or you don't.

Aug 29, 2023
How Hollywood is Losing Ground to Silicon Valley's Big Tech Giants

Jun 05, 2023
Is Apple's Anticipated AR/VR Headset a Misplaced Bet in the Current AI-Driven Market?

Jun 03, 2023
Bose QuietComfort Earbuds II vs. Apple AirPods Pro: A Personal Experience

Jan 19, 2023
How I Ran My Own Mastodon Server in 10 Minutes

Apr 01, 2019
MacBook Pro (eGPU) vs Hackintosh GPU

Jan 12, 2019
My New Silent, Small Hackintosh for 600 EUR

Nov 22, 2018
Instacast is Now Free and Open Source

Sep 12, 2018
What makes a Mac Pro a Mac Pro

Jul 14, 2018
Why you Should Build a Hackintosh

Apr 16, 2018
Why the Blackmagic Pocket Cinema Camera Is Not a Good Vlogging Cam

Apr 09, 2018
ProRes RAW is Here

Apr 03, 2018
Is the Nokia Steel HR Smart Watch an Apple Watch Killer?

Mar 04, 2018
Workaround for Buggy DNG Handling in macOS

Mar 03, 2018
Colorcast 0.5 Adds Support for Cinema DNG, Anamorphic De-Squeeze and Slow Motion

Feb 06, 2018
Open-Source Objective-C API for Magic Lantern

Feb 06, 2018
Colorcast v0.4 Includes RAW Engine And Supports Magic Lantern

Jan 25, 2018
Thoughts on the DJI Mavic Air

Jan 24, 2018
Why I bought a Sony Alpha 7 Mark II in 2018

Jan 18, 2018
Using Metal Performance Shaders with Core Image

Jan 15, 2018
Night-Mode For Your iOS App

Jan 15, 2018
What’s Color Grading and Why You Want That

Jan 09, 2018
My Review of Gearo.de

Dec 27, 2017
Everything That's Wrong with Hackintosh

Dec 21, 2017
Colorcast Alpha v0.3 Available

Dec 19, 2017
RX Vega 64 Hackintosh for High-End Video Work

Sep 07, 2017
Colorcast Alpha v0.2 Available

Aug 31, 2017
First Alpha Version of Colorcast Available

Jun 01, 2015
Vemedio Product Development Has Been Discontinued

Apr 16, 2015
Audio Books vs. Podcasts

Mar 21, 2015
Rejected for Weak Linked Frameworks

Mar 19, 2015
Ideas for A Better App Store

Mar 05, 2015
Auto-Layout works

Feeds

martinhering.me/rss